


LED matrices offer very special options for displaying photos, letters, electronic tickers, pictures and even videos. They are a real eye-catcher in the living room at home, as well as in shop on advertising displays or at trade fairs. For even more design freedom, several boards can be interconnected so that an LED wall is created.
In this how-to we demonstrate how you can control one or more LED matrices with the Raspberry Pi.
The project
- Suitable for: Beginners with previous knowledge
- Time required: approx. 1.5 – 2 hours
- Budget: from approx. 90 euros
- Required components: RGB matrix module, Raspberry Pi 2 (or higher), SD card, RB-MatrixCtrl controller board, one power supply per matrix module
- Requirement: mouse, keyboard, screen, internet access
The material
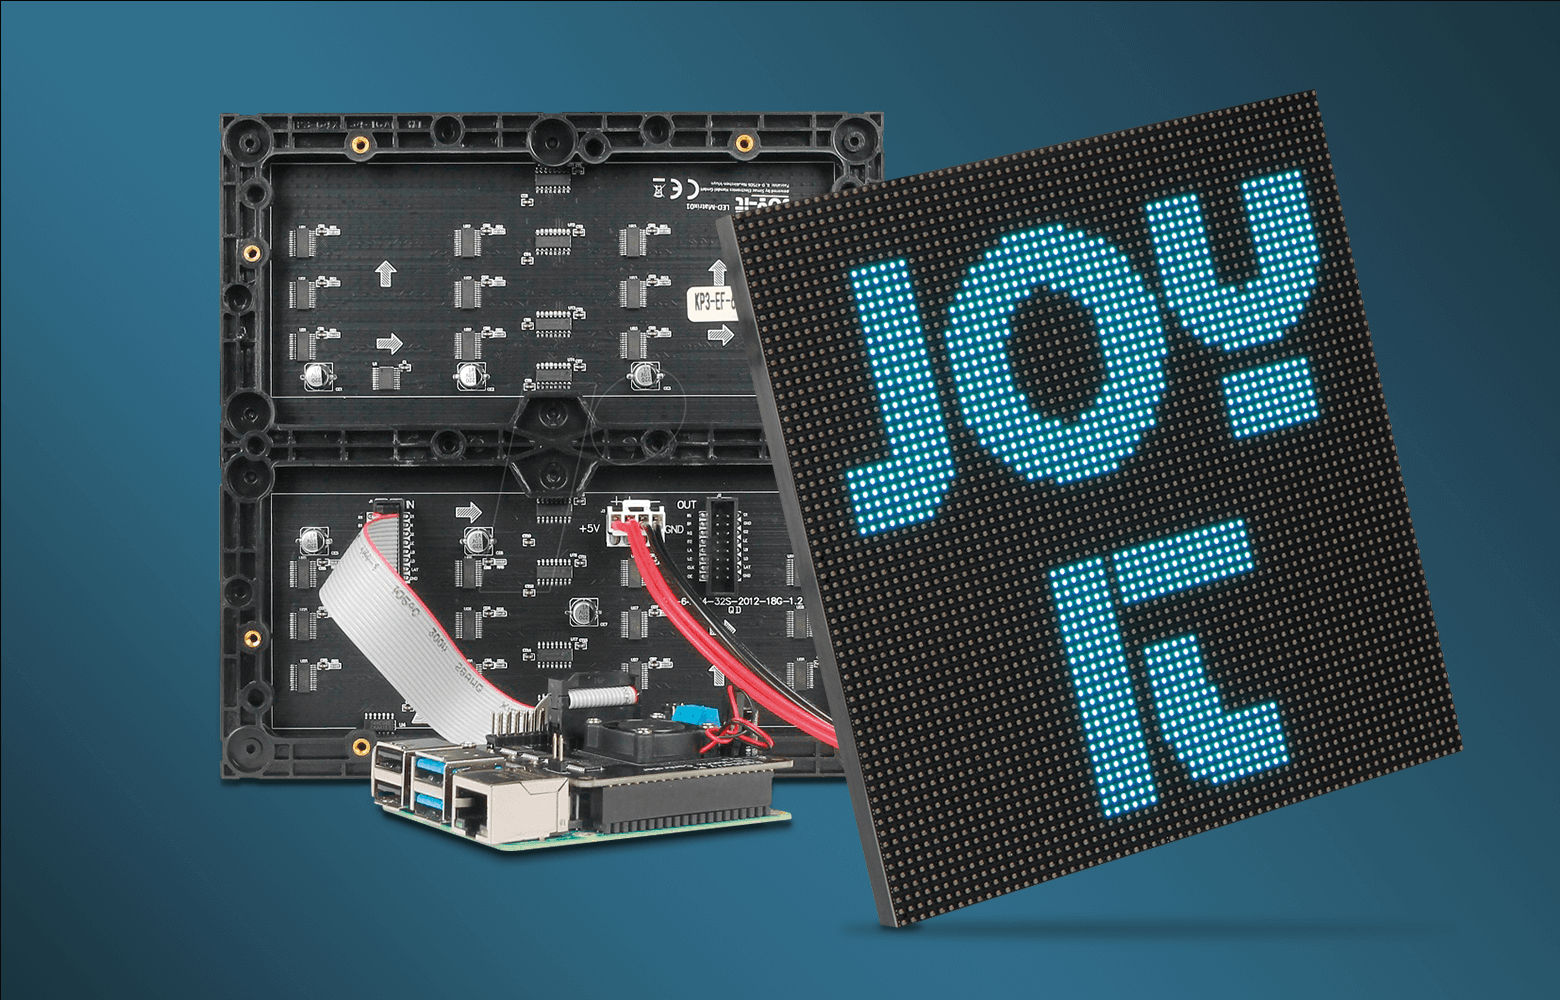
For this how-to we use an RGB matrix module with 4096 LEDs and a particularly small pitch of only 3 mm. So graphics or even films can be reproduced in a visually appealing way.
Control is achieved using mini PCs such as Raspberry Pi, Arduino, BBC Microbit and many other modules. In our How-To, we implement the control with the most common developer board, the Raspberry Pi.
The RB-MatrixCtrl controller board is ideal for control with the Raspberry Pi. With this expansion board, you can control up to three RGB LED matrix rows with a common HUB75 connector. In addition, a 25×25 mm fan is installed, which provides the necessary cooling of the Raspberry Pi.
A separate power supply unit (ideally with 5V and approx. 8A) is required to operate the LED matrix. A sufficient cable cross section must also be ensured.
Put the LED matrix into operation
First, the cable for the power supply included in the set must be connected to the LED matrix and the power supply.
If several matrices are to be interconnected, proceed as follows: Up to three matrices can be operated in parallel on the 40-pin GPIO strip of the Raspberry Pi. In addition, further matrices can be connected in series to each matrix.
Use the HUB75 plug contact for this. This is marked on the matrix with IN. Additional matrices can be connected in series via the OUT contact.
Attention: When connecting several matrices, be sure to adjust the power supply accordingly!

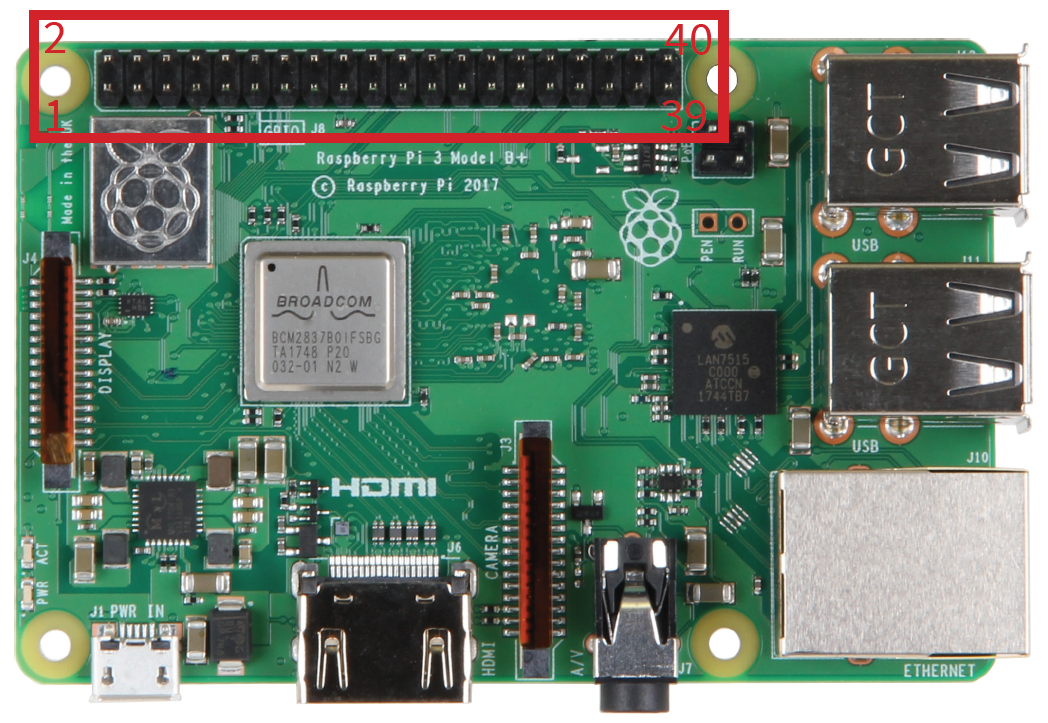
Here you will find an overview of the GPIO bar of the Raspberry PI and which pins you can use for which of the three matrices connected in parallel:
| CONNECTION | PIN | PIN | CONNECTION |
|---|---|---|---|
| - | 1 | 2 | - |
| G1 (Matrix 3) | 3 | 4 | - |
| B1 (Matrix 3) | 5 | 6 | GND / N (Matrix 1+2+3) |
| LAT (Matrix 1+2+3) | 7 | 8 | R1 (Matrix 3) |
| - | 9 | 10 | E (Matrix 1+2+3) |
| CLK (Matrix 1+2+3) | 11 | 12 | OE (Matrix 1+2+3) |
| G1 (Matrix 1) | 13 | 14 | - |
| LA (Matrix 1+2+3) | 15 | 16 | LB (Matrix 1+2+3) |
| - | 17 | 18 | LC (Matrix 1+2+3) |
| B2 (Matrix 1) | 19 | 20 | - |
| G2 (Matrix 1) | 21 | 22 | LD (Matrix 1+2+3) |
| R1 (Matrix 1) | 23 | 24 | R2 (Matrix 1) |
| - | 25 | 26 | B1 (Matrix 1) |
| - | 27 | 28 | - |
| G1 (Matrix 2) | 29 | 30 | - |
| B1 (Matrix 2) | 31 | 32 | R1 (Matrix 2) |
| G2 (Matrix 2) | 33 | 34 | - |
| R2 (Matrix 2) | 35 | 36 | G2 (Matrix 3) |
| R2 (Matrix 3) | 37 | 38 | B2 (Matrix 2) |
| - | 39 | 40 | B2 (Matrix 3) |
Interposition of the matrix controller board
As an alternative to connecting the matrices directly via the GPIO bar on the Raspberry Pi, you can also use the RB-MatrixCtrl controller board to control up to three matrices in parallel. Here, too, there is the option of connecting additional matrices in series.
The advantage of control via the controller board is the significantly easier connection option. In addition, the controller board can supply the Raspberry Pi with power and has already installed a fan that provides sufficient cooling.

Assembly of the matrix controller board
First plug the matrix controller board onto the GPIO bar of your Raspberry Pi. Now connect the HUB75 plugs of your matrices to the corresponding connections (Panel 1, Panel 2 & Panel 3) on the controller board.
If you want to supply your Raspberry Pi with power directly via the controller board, you can also connect a voltage source of + 5V directly to the controller board. Please note that the connection is not protected against reverse polarity and reverse current. The connection is not suitable for supplying the matrix with power.
Important: Check the pin assignment of the E-pin (or LE) on the LED matrix. Depending on the matrix, this can vary between the fourth and eighth pin. Accordingly, you can adjust the assignment with the left jumpers on the controller board. Set the connection depending on the assignment of your matrix.
If the fourth or eighth pin of your matrix is on GND (or N), you should jump accordingly on the controller board.

Installation of the LED matrix
The first step in controlling the matrix with the Raspberry Pi is to install the associated library. Open the command terminal and enter the following:
sudo apt-get update
sudo apt-get install git
git clone https://github.com/hzeller/rpi-rgb-led-matrix
Then the onboard sound must be deactivated. Since the matrix uses a clock circuit that is also used by the onboard sound, simultaneous use is not possible.
If you still need a sound output, you should use an external USB sound adapter. To deactivate the onboard sound, first open the config file with the following command:
sudo nano /boot/config.txtFind the line “dtparam = audio = on” and change it to “dtparam = audio = off”. Now save the file with the key combination Ctrl+O, confirm with Enter and then exit the editor with the key combination Ctrl+X.
Then restart the Raspberry Pi for the change to take effect:
sudo rebootWith these commands you can reach the downloaded library and prepare the demo program:
cd rpi-rgb-led-matrix
make -C examples-api-use
Now the demo program can be started. When starting the program, be sure to specify the number of LEDs per row and column. In our case there are 64 LEDs per row and column.
sudo examples-api-use/demo -D 0 --led-rows=64 --led-cols=64Then you can adjust the speed, for example if you have a slower panel or a faster Raspberry Pi. The command –led-slowdown-gpio = <0 … 4> can only be executed with values between 0 and 4.
sudo examples-api-use/demo -D 0 --led-rows=64 --led-cols64 --led-slowdown-gpio=2Use with Python
To control the matrix with Python, you can execute the following commands in the terminal:
FOR PYTHON 2:
sudo apt-get update
sudo apt-get install python2.7-dev python-pillow -y
make-build-python
sudo make install-python
FOR PYTHON 3:
sudo apt-get update
sudo apt-get install python3-dev python3-pillow -y
make-build-python PYTHON=$(which python3)
sudo make install-python PYTHON=$(which python3)
How to get to the Samples folder:
cd bindings/python/samplesThere you will find various examples for testing your matrix. Examples can be started with the following command:
sudo ./runtext.pyThe execute command also accepts the additional parameters –led-rows, –led-chain and –led-parallel –led-rows, –led-chain und –led-parallel.
- –led-rows: Number of rows in a panel. Values such as 8, 16, 32 and 64 are common here. For a 64×64 matrix, the value would be 64.
- –led-chain: Number of matrices connected in series. The standard value for a single matrix is 1.
- –led-parallel: Matrices connected in parallel. Values between 1 and 3 are common here. The standard value for a single matrix is 1.
The additional parameters are simply added after the original command:
sudo ./runtext.py --led-chain=4Show videos and pictures
Now we come to the creative part of the how-to: the display of images, GIFs, graphics and entire videos via the matrix. The image files to be displayed must be stored in this folder:
cd /home/pi/rpi-rgb-led-matrix/utilsYou can use the LED Image Viewer to display the images. To do this, you need the following command:
sudo ./led-image-viewer beispiel.gifVideos can be played with this command:
sudo ./video-viewer beispiel.webmAdditional parameters
Additional parameters can be added to the display command for further functions and definitions. The main parameters are the following:
| PARAMETER | FUNCTION |
|---|---|
| -C | Centers the picture |
| -w | Multiple pictures: Waiting time in seconds until the next picture is displayed |
| -t | Animations: Stops execution after x seconds |
| -l | Animations: number of complete cycles |
| -D | Animations: Delay between frames. Default value: -1 |
| -f | Multiple images: Permanent cycle through all images |
| -s | Multiple images: random order |
| --led-rows= | Number of rows per matrix. Usually 8, 16, 32 or 64 |
| --led-cols= | Number of columns per matrix. Usually 8, 16, 32 or 64 |
| --led-chain= | Number of matrices connected in series |
| --led-parallel= | Number of matrices connected in parallel |
| --led-brightness= | Brightness in percent |
| --led-show-refresh | Shows the refresh rate |
A comprehensive list of all parameters can be found here.
Use in own projects
The library can also be integrated into your own projects. You can find the necessary include files in the include subfolder. The library is located in the lib subfolder. C ++ library is used natively, but there are also C and Python libraries.
In addition, other external connections were developed:


