Just another smart home standard?
The last years have been very eventful for home automation. Everyone is talking about IoT and many manufacturers offer solutions for it.
After the initial enthusiasm, however, disillusionment usually follows: there are an infinite number of standards and solutions, many are managed in a cloud and often products become useless and incompatible with each other if the manufacturer stops providing service. In addition, there are many different programs and apps for controlling the individual devices.
Home Assistant is the solution to all these problems for you as DIYer. Here you can install your own powerful home automation software on your own server – and in the simplest case a Raspberry Pi is enough – and use it not only for the devices you develop yourself, but also for integrations of all imaginable IoT manufacturers. And all this is Open Source.
Interested? In this How-to I will show you how to install Home Assistant on a Raspberry Pi and give you an overview of functions and possibilities.
The project
Time required: min. 3h (advanced)
You need this:
- A server, in the simplest case a Raspberry Pi
- Programming knowledge in Python is advantageous
Project overview
There are several ways you can install Home Assistant on a Raspberry Pi.
We recommend the so-called HassOS (for Home Assistant Operating System, to be found on Github at https://github.com/home-assistant/operating-system), which is a preconfigured image.
For me personally, this method did not always work well and I had to reinstall the server due to problems. If you still prefer to use this method, you can find all information here.
I recommend the manual installation. It may be a bit more complicated at the beginning, but in operation it has proven itself to me because of its lower complexity and good maintainability.
If you already have a NAS or server at home, it is a good idea to install Home Assistant on it. Among the guides provided by the community you will find instructions for e.g. Synology devices. In addition, there is a community plugin for FreeNAS that you can find on Github.
The manual installation
The installation follows these instructions from the documentation. Should the process change in the future, you will find the most current information there.
I will briefly summarize the necessary steps for you again.
After we have opened the terminal on our Pi, we first install all necessary packages:
sudo apt-get update
sudo apt-get upgrade -y
sudo apt-get install python3 python3-dev python3-venv python3-pip libffi-dev libssl-dev
Then, for security reasons, first create a new user “homeassistant” with which the Home Assistant process is executed.
This user will also be added to three additional groups that are required to run various services.
sudo useradd -rm homeassistant -G dialout,gpio,i2cPlease set a password for the user on your system.
Afterwards we create the installation directory, also called “homeassistant”, and give the necessary read and write rights to the user “homeassistant”.
cd /srv
sudo mkdir homeassistant
sudo chown homeassistant:homeassistant homeassistant
The following step is necessary to manage Python dependencies cleanly and separately from other projects on your Pi.
You create a venv (virtual environment, documentation can be found here), which will use the libraries and the correct Python version.
To do this you first switch to the user “homeassistant” via:
sudo -u homeassistant -H -sand initialize and activate the venv:
cd /srv/homeassistant
python3 -m venv .
source bin/activate
At the end you install python-wheel and with the Python3 package manager pip3 Home Assistant.
python3 -m pip install wheel
pip3 install homeassistant
Now everything is prepared and you can start Home Assistant, short hass.
hassThe first start takes a very long time, because more content will be installed. Once this has been done, however, all further starts are fast.
If this is also done, the web interface of your own home automation software can be accessed via HTTP on port 8123.
To do this, open the browser and enter the address in the address bar:
localhost:8123
Of course you can also access the website from any other device in your home network. First find out the IP address of your Raspberry Pi:
ip addr showIf your Pi is connected to the router via WLAN, the IP will be under the node “wlan0”. If you connected it with an ethernet cable you will find the IP in the node “eth0”.
In the picture you can see how Home Assistant welcomes you at the first start.

Configuration and extensions
After you have entered names and the basic settings, you can already integrate your IoT devices.
Scroll through the list and get an overview of the many integrations, perhaps you already have a device that can be controlled via Home Assistant. There are of course many more modules and new ones are added daily.
I recommend to browse the overview of the integrations to get more ideas.
This How-to should create the necessary basics in infrastructure and knowledge to understand the further articles of this series and to be able to implement them yourself. Therefore you will also get to know the configurations.
The further options for automation, configuration and also presentation of the website can be found in the extensive documentation.
There are basically two ways to configure Home Assistant:
- on the website under the menu item Settings
- with a text editor and the configuration files (in this example found under /home/homeassistant/.homeassistant) directly on the Raspberry Pi
Tip: Changes in YAML’s configuration files can cause errors that can lead to problems at restarts.
You can check the configuration on the website as well as on the Pi.
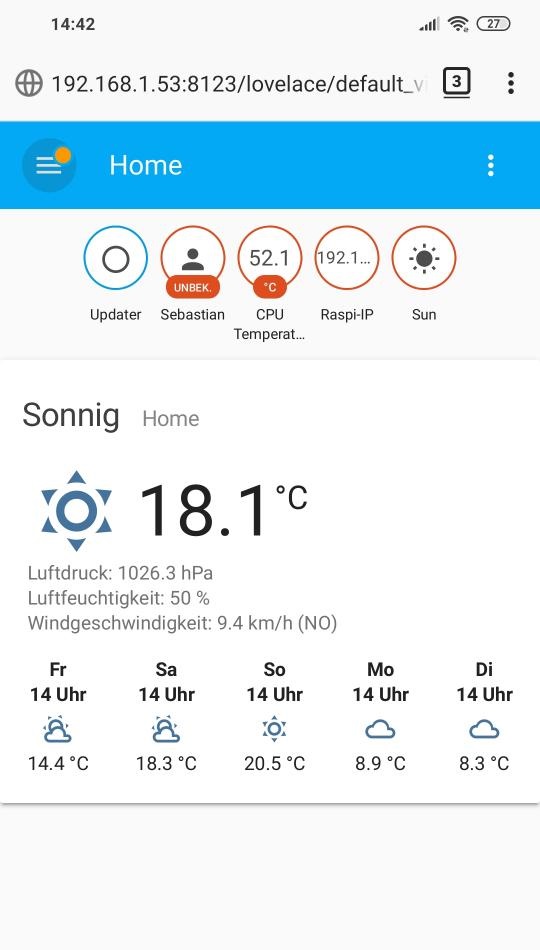
First, we add a display about the IP of our Raspberry Pi via the website.
To do this, go to Settings > Integrations > + and search for “Local IP address”. Then you give the sensor the name “Raspi-IP”. In the overview you will then find the sensor in a circle at the top. Click on it to display the desired information.
The next sensor should give you the temperature of the CPU of the Raspberry.
To do this, open the following file on the Raspberry Pi
/home/homeassistant/.homeassistant/configuration.yaml
Attention: You must do this with the user “homeassistant”.
If you are not logged in with this account, simply enter the following in the console:
sudo su homeassistant
nano configuration.yaml
Then add this entry to the end of the file and save the file (CTRL+, Enter, CTRL+x).
Don’t forget to check the Config. To do this, close hass in the previously opened terminal and then execute the following line:
hass --script check_configIf everything fits, restart Home Assistant and see the result in your browser:
More options
As you can see, the possibilities are almost unlimited, although you have only scratched the surface so far.
Sensors alone are not very useful yet, but now you can use them to create automations, to design the interface, and much more.
Sind Sie durch den Artikel Sensordatenbank auf dem Raspberry Pi auf den Geschmack gekommen und wollen die vom Home Assistant gesammelten Daten länger aufbewahren und verarbeiten?
The InfluxDB integration offers the possibility to store selected data in an InfluxDB!
Im nächsten Artikel dieser Reihe werden Sie eigene Sensoren programmieren und in Home Assistant einbinden und somit noch tiefer in die Materie eintauchen.
Title picture composed of:
Home Assistant Logo – Jeremy Geltman / Wikimedia Commons / CC BY-SA 4.0
Raspberry Pi Photo – Michael Henzler / Wikimedia Commons / CC BY-SA 4.0